Concrete Decorative & Resurfacing Guides & Resources

Trending Searches

Plumbers

Dentists

Hairdressers

Electricians

What is Burnished Concrete?

What is Burnished Concrete?

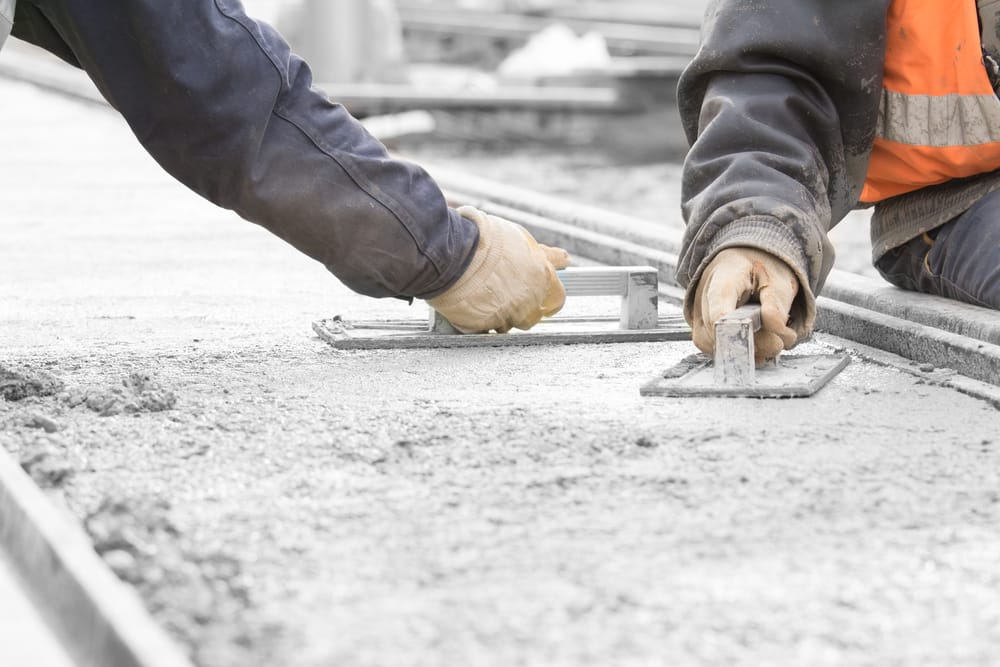
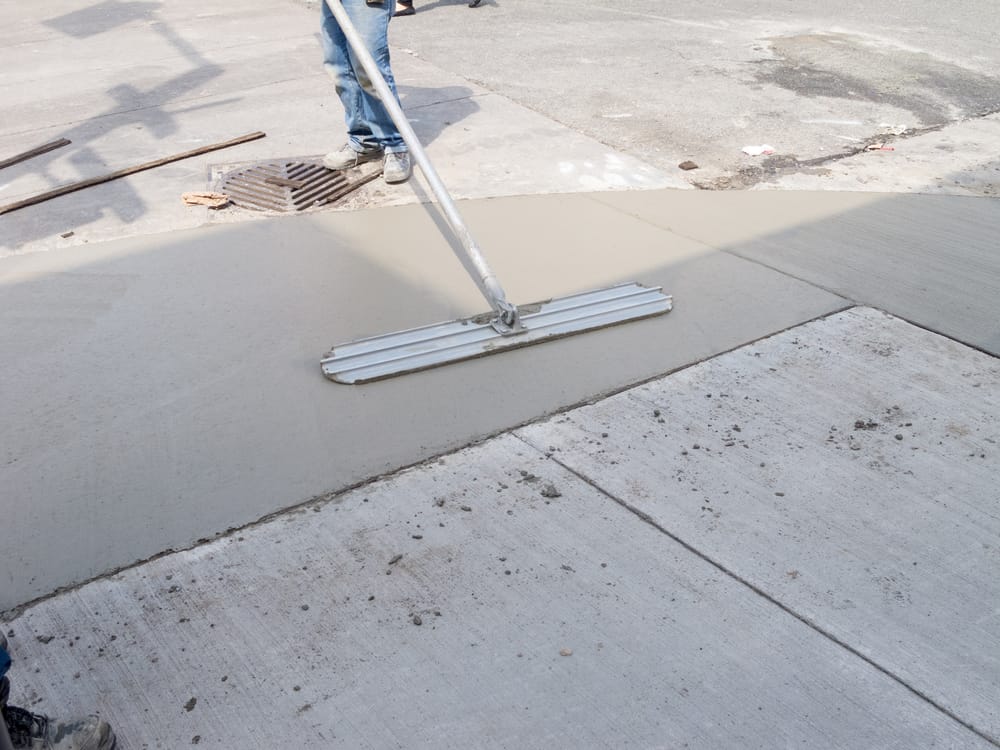
These floors are gaining popularity because they offer the strength of concrete with the added beauty of natural stone. Burnished concrete is a type of concrete flooring that has been polished to a high glossy finish. This process can also be referred to as honed or tumbled concrete floors, but the main difference between the burnished and polished concrete process would be that burnishing doesn't actually remove any material from the concrete surface. The end result is a stunning polished floor that bears little resemblance to the original slab. Burnished concrete floors come in an array of decorative concrete colours and finishes but tend to be very earthy looking because the concrete itself has not been dyed or stained. These floors are gaining popularity because they can offer the strength reduction of concrete with the added beauty of the natural stone. The consistent colour means a burnished floor won't need regular cleaning like other types of concrete do. Once installed, all you need to do is sweep or sweep and wipe depending on what type of burnished finish you choose. Unlike polished marble or granite, burnished floors do not require any concrete polishing to maintain their lustre, just regular mopping for cleanliness. There are different factors that affect how much and how well a concrete surface will be burnished. When the concrete is poured, it needs to be vibrated and settled before entering the curing stage. Poor uneven trowelling will show in the final concrete floor. With an uneven concrete floor, you will struggle to get a smooth surface. There is a better chance of achieving a high-shine finish once polished if more time is allowed until the concrete sets. Compacted floors don't take as well to polishing as those that have been given time to settle and cure naturally during those first few days after pour day. Curing is one of the most important parts of the polishing process to create a successful burnished concrete finish or honed finish. Each type of material has different reaction times and care needs during the first few days and weeks after it has been poured and finished. If your concrete needs to cure for 28 days before installation, you should wait those full 28 days before having the slab polished & honed. Curing times can vary greatly depending on what type of mix was used as well as environmental factors such as humidity and moisture content (related: water vs. cement ratio ). Water-based curing materials are usually applied within 24 hours of finishing because they don't require long drying times. Solvent-based curing compounds dry more slowly but are generally still safe to polish in about two weeks time after application if allowed proper time to cure properly. Given the perfect conditions, it's possible to be ready for polishing within a week of pour day. Still, it's also possible to wait 4 weeks without worry for the material to be ready. The type of mix used, environmental factors and how much time spent curing are all determining factors in whether or not your polished floor will take properly. ## How do I burnish concrete? There are several different techniques if you're looking to get your hands dirty doing the polishing yourself. For a floor that is already polished and just needs some touch-up work, you can use masonry sandpaper on a 4' grinder and diamond pads for your burnishing tool. With the surface wet, these tools will smooth any imperfections or marks and restore lustre to your floor. Typically, the burnishing process involves using a burnisher to heat the concrete floors. The machine then melts and rubs a topical coating and injects it into the concrete slab. A wax-based product can also be used as a sealer. Sealing agents leave the surfaces protected and yield a polished concrete floor with a better finish. ## Is burnished concrete and polished concrete the same? Burnished concrete is also known as honed or tumbled concrete. Both of those terms refer to finishing a concrete slab after it has been poured. However, polished concrete is a completely different process. Polished concrete actually removes material from the flooring so that it comes out with a glossy finish. It's also possible to have both processes done at once, creating a burnished polish on your floor, but this isn't the most common combination and requires extra care during installation as well as more time spent curing before polishing can begin. Adding a concrete densifier will strengthen the burnished floor, making it a more versatile material. ## What are some types of polished concrete? Polished concrete floors come in three main categories: mechanical polishing, diamond abrasives and micro-abrasives. ### Mechanical polishing This mechanical polish uses either diamond pads or steel wool for your burnisher, along with a machine to spin the tool. This method takes quite a bit of time and labour but will remove more material for a deeper shine on your finished floor. ### Diamond abrasives This type of polished concrete is created by grinding & polishing with diamond bonded abrasives or silicon carbide paper, then sealed in using acrylic urethane or epoxy for protection. ### Micro-abrasives This is when you polish concrete using diamond powders, resin & polymer compounds through high pressure, abrasion and heat to create the perfect finish on your floor. More affordable than mechanical polishing or diamond abrasives, micro-abrasive techniques leave behind little to no waste material while still creating beautiful results. ## How long does it take to burnish concrete? Burnishing concrete is a time-consuming process. If your polished concrete flooring has been done using micro-abrasives, it usually takes about an hour or two to complete the entire job. Mechanical polishing can take several hours and diamond abrasives even longer to achieve, depending on how large of an area you're finishing, but they both leave behind much less waste material than micro-abrasive polishing techniques. Of course, these amounts are just for one person doing the work, so this amount could double or triple if you have a larger area to cover. Concrete floors can provide great thermal comfort, according to the [Australian Government's YourHome website](https://www.yourhome.gov.au/materials/concrete-slab-floors). ## How do I clean burnished concrete? If you need to clean your polished floors, use plain water with a very mild cleaning agent such as dish soap along with either a brush or mop. If your floors are treated with a sealant, check the manufacturer's instructions on how to clean them before proceeding. If you need to clean your concrete driveway, [take a look here](/guides/concrete-decorative-resurfacing/how-to-clean-concrete-driveway). ## How much does concrete burnishing cost in Australia? The cost for a burnishing process varies depending on what kind of concrete flooring you have. Using mechanical or diamond abrasive techniques will be more expensive than micro-abrasives, but both are still less costly than most other flooring types like carpeting, laminates and tile. A polished concrete floor costs, on average, between $45 and $70 per square metre. The burnished finished floor usually comes out to about $10-$25 extra per square metre than polished. Burnished concrete is often confused with other types of concrete finishes, such as polished concrete and honed concrete, since all three are finished after the concrete has been poured and set in place. It is not similar to [screeded concrete](/guides/concrete-decorative-resurfacing/how-to-screed-concrete). Burnished concrete was originally utilised by commercial projects in high-traffic areas such as hospitals and shopping centres since the process involves little to no waste material. However, after being modified for use in residential projects, it became one of the top choices for flooring throughout Australia.

Concrete Decorative & Resurfacing Guides & Resources

How To Screed Concrete

How To Screed Concrete

Screeding concrete is a process where wet concrete is levelled to the proper depth, typically with a steel trowel, and finished with another tool. Concrete finishing tools can be made out of aluminium or stainless steel for use in exterior settings where strength and weather resistance are important. Hand screeding concrete is not usually used for large projects. A self-propelled motorised screed can be used to finish a large slab, typically with the assistance of other tools. ## How is screeding done? The screeding process begins by placing the fluid concrete in position with a pump or other method. The material is typically placed between forms, which are then removed when it has solidified. If not careful, workers can potentially damage the wet concrete by using the wrong tools to remove the forms, especially if they are not soft enough to avoid tearing or scratching the surface of the fresh concrete. Screed rails are installed at the edges of each section where it meets adjacent sections to create a straight edge so using the screed rails that successive slabs line up properly without interrupting joints between them. Screed rails are typically made from steel channel shaped stock and have holes drilled along their length for attaching temporary guide boards called 'screed stops'. A screed stop board is a wallboard sized and cut to the distance between a concrete form and a screed rail. The stop boards are attached to one or more steel stakes driven into the ground at intervals along the base of the forms. Other types of tools are a screed board, straight board and power screed A variety of tools can be used to perform this task, including various aluminium or stainless steel trowels, float blades, square shovels, bull floats and squeegees. In large projects, it is common for workers to use an automated powered screed that is guided by rails laid out in advance on which stops have been placed at regular intervals. A manual tool called a 'bull float' may also be used with a separate tool called a 'squeegee' to partially cure high spots before power finishing takes place. As the concrete is worked it may be necessary to add or remove water (if too dry) or add portland cement (if too wet) in order to correct its workability. Depending on the particular use of the finished product screeding can take place anywhere from a few minutes after placing until several hours afterwards, so long as it remains in a plastic state before hardening begins. In a typical residential setting, a final finish layer might receive minimal hand screeding after being floated and immediately followed by steel troweling for added durability and gloss. The Australian Government's [Your Home website](https://www.yourhome.gov.au/materials/precast-concrete) has a handy guide to concrete. In commercial projects, however, multiple layers of material might be applied fairly rapidly with very little waiting time between them before adequately curing each layer before adding the next one. This would especially apply if the application was for a concrete floor and flooring surface, either for inside or outside use. ## What is a power trowel? A power trowel is a motorised device that has a rotating steel blade and a strong vacuum system to suck up excess concrete from the concrete floor while it's being smoothed. When the machine moves across an area of wet concrete, its blades scrape the surface flat and excess concrete, removing the high spots and allowing any excess cement mix to be sucked into its pan. In addition to making the concrete surface a smooth surface , power trowels serve other purposes including shaving off ridges or stamping designs into the surface for decorative effect. In order to screed a concrete slab successfully, you need to have an understanding of a variety of different factors which can influence the project, including how water affects the mix design, how temperature will affect setting times and what different tools are available to help make the process easier. A good screed finishing process requires a certain amount of experience with the use of various tools to properly prepare the surface, which benefits greatly from being watched over by an experienced supervisor who can adjust techniques during the process. ## When should you screed concrete? Screeding is normally done when the concrete has sufficiently hardened enough that it can support its own weight, but not so much that it cannot be worked. It also needs to be free of laitance, which is a layer of powdery material on the surface. To prevent this from forming, [properly mix your batch](/guides/concrete-products/concrete-mixing-ratio) using dry materials and make sure you don't skimp on water or skip adding chemical mixtures. Also, wait until there are few if any foot or vehicle traffic in the area since they will leave impressions behind in freshly set concrete which are difficult to remove later by screeding. The most common time for screeding is about 24 hours after pouring concrete, just before cure and concrete finishing process. ## What is concrete curing and finishing? Concrete is usually cured by misting the surface with water twice a day. The goal is to keep it moist and let any excess moisture slowly evaporate, which can be done in several different ways: - Placing plastic sheeting over the concrete and periodically spraying it. - Using a slow-release dampening system that automatically sprays every few hours on an automated timer. - Creating an enclosed space where humid air is released while the concrete cures inside of it (also called a hot box). Concrete finishers use a variety of different tools to achieve the desired effect, depending on the type of surface being created. Some examples include squeegees for large flat slabs or rubber trowels for stamping designs into pre-mixed concrete. ## What is the correct mix for screed? Concrete for screeding should be no more than three parts sand, three parts stone and one part cement. It should also include chemical admixtures such as superplasticisers to keep it well. This means it will blend and work fine without cracking or settling too much. [Fine aggregates](/guides/concrete-products/what-is-exposed-aggregate) such as silica sand should be used whenever possible to provide a smooth finish and smooth surface. Finally, the addition of calcium chloride and magnesium chloride can help reduce water demand and retard or prevent cracking. ## How do you use a screed to level concrete? Depending on what type of surface is being prepared, either hold the screed directly over the centre line of the slab or in a straight piece parallel to it. Screed bars can be made of wood, aluminium or steel, but avoid stainless steel which is typically too slippery. The depth of the screed should depend on how much material needs to be removed and how deep it is based on your experience with the type of concrete you are working with. Generally speaking, any depth that leaves between 1/8" and 3/16" will produce a flat surface with no visible horizontal lines after it dries. To remove stringy laitance from the area being worked on, scrape off any ridges using a broom or stiff push broom before screeding over them again. Begin the process by placing the leading edge of the screed bar at one end of where you want to start forming a level surface and use the same setting on both sides. Bend your knees and start by pushing down in front of you with a slight forward motion that will result in a product that is level with one another. The screed bar should be held parallel to the concrete until just before it reaches the opposite edge, at which point you should veer off slightly so that it is angled back towards the centre of the slab. Be sure to go slowly and keep your arms and spine straight so as not to exert too much pressure on them. It's a little [different to honed concrete](/guides/concrete-polishing-sealing/what-is-honed-concrete). It takes about ten passes over an area to properly smooth out uneven spots after it has been screeded. The last pass, known as skimming, consists of holding the blade almost flat against the top and dragging it over to create a perfectly even surface.

How to Clean a Concrete Driveway

How to Clean a Concrete Driveway

Concrete driveways are tough, durable, and aesthetically pleasing. They're also porous which allows water to seep into the dirt below. This can create several problems, including muddy areas around the concrete, fresh spills and grass growth in impenetrable dirt patches. However, regular maintenance of your concrete driveway with some simple cleaning products with household cleaners can keep it looking great to enhance curb appeal while preventing many of these issues. A power washer with other household cleaners is a great concrete cleaner for a thorough concrete cleaning to remove driveway stains and grease and oil stains. ## Best ways to clean a concrete driveway Wait until the concrete is dry to remove stains for a great concrete cleaning. The driveway takes only a couple of hours before becoming spotless. Flushing water over concrete while it's damp can damage the surface by eroding cement paste, etching delicate aggregates, or pushing sand into cracks. If you have to use water on wet concrete to remove stains for concrete cleaning, sweep it off with the right tools when you're finished so solids don't settle in low spots and cause stains later on. Sweep up loose organic debris with a broom before washing. Leaves, sand, and dirt need to be removed from the driveway before washing. Sweep them up or use a leaf blower to move them into a pile. Add 1 cup of liquid dish soap per gallon of lukewarm water for concrete cleaning on the driveway. Use liquid dish soap for cleaning concrete because it creates suds that trap and carry away dirt and is good for removing lawn fertiliser stains but keep in mind that a strong detergent will darken porous concrete if left on too long. Use lukewarm water and a misting nozzle on a garden hose to apply the soapy solution from a spray bottle for cleaning concrete, then vigorously brush with a broom on the driveway. Rinse off soap residue immediately after washing and cleaning concrete with clean water. Before using soap on a concrete driveway that is currently being stained, it is important to use dish soap instead of products containing bleach because bleach can produce undesirable results. If you don't see any change after cleaning, try scrubbing with a brush and baking soda on the driveway. This will work on stubborn stains caused by oil and other chemicals. Always remember to use non corrosive material to scrub and then rinse the stain well. A stain that will require bleach for cleaning should be done with a soft scrub and a good rinse. Soak the concrete with water before doing the job. ## What is the best chemical to clean concrete? There are only a handful of chemicals that work for concrete driveways. Each has its advantages and disadvantages, so how can you choose the best option, especially if you have something like [burnished concrete](/guides/concrete-decorative-resurfacing/what-is-burnished-concrete). Here are some things to take into consideration when deciding which chemical is best for your needs. To clean the stain soak the concrete and scrub well for a good job. ### Bleach Bleach solution is easy to obtain, cheap but it can etch the surface if left on too long and can also discolour porous cement surfaces but is great for little elbow grease. So let it sit for a few minutes only and you can mix bleach with one part water for diluting it a little. But it can also damage the nearby plant life so spray carefully. ### Caustic soda Safe for use on most surfaces, it is more corrosive than other chemicals for cleaning, so you need to take care when using it and let it sit as it says on the directions. The high pH content of caustic soda will open up concrete pores and soften lime deposits that might cause staining in the future. It will also kill grass growing around concrete driveways. Use gloves and eye protection while working with this chemical to avoid skin irritation or loss of sight because this chemical will burn eyes and skin on contact. ### Muriatic acid Available at most hardware stores, muriatic acid is very acidic which means that if not handled correctly it can damage the surrounding vegetation when you're making the driveway clean and etch the surface of the concrete. It is also extremely dangerous to handle and can burn the eyes, skin, and respiratory system on contact. Use the spray nozzle to spray as needed. ### Sodium hypochlorite Available at most hardware stores, sodium hypochlorite is a powerful disinfectant that kills bacteria that cause stains from oil, grease and mould. This chemical has been known to fade the colour of concrete surfaces so take care when using it. It will also only work if applied directly over the stain or area that needs cleaning so you will have to figure out where this stain or area is before using the solution. ### Trisodium phosphate (TSP) TSP may be used as a cleaner for concrete driveways because it cuts through oils, grease, dirt and grime easily. It's a degreaser that is also a very effective cleaner for exterior surfaces. It's a nonflammable powder that can be found in most hardware stores and paint shops. In general, when working with any chemical you need to follow the manufacturer's advice on storage, application, and disposal. ## Concrete driveway cleaning tips - Use a steam cleaner to pressure wash your driveway and clean mould and wait a few hours before the next step to dry the concrete. - Clean off greasy spills with paper towels and dish soap. Wipe up any excess oil or grease with a paper towel before cleaning it. You can use natural cleaner, or baking soda too. A pressure cleaner can be used in the end with other materials. - Remove tire marks by scrubbing the area with a brush and soapy water from a liquid dish detergent and pressure cleaner to perfectly clean the place. - Use some tarps on your driveway to protect it from wet paint, oil drips, rust stains and other spills on the concrete surface that might cause stains if left unattended. While this won't fix the problem entirely, keeping these spots clean and dry will make sure that your concrete surface stays looking nice for longer. ## Can I pressure wash a concrete driveway? Yes, you can use a pressure cleaner on a concrete driveway to clean it. If the surface is very dirty or has oil stains, use a combination of high-pressure water and a cleaning solution. Apply the cleaner with a garden hose attachment first for best results. Pressure washing using a pressure cleaner should always be done in small areas before doing the entire driveway at once so that you don't accidentally remove too much of the top layer of cement while cleaning. Always test your solution on an inconspicuous area before using it on your driveway, then adjust as necessary if needed. Pressure washing is a handy way to clean concrete driveways, especially if you have one with a lot of stains or other stubborn dirt. ## What pressure is best to clean a driveway with a pressure washer? It's important to choose the right pressure for your concrete driveway cleaning. Cleaning under high-pressure water can damage concrete and you might even remove too much of the top layer of cement. The best way is probably to start with low pressure and only increase the strength of your solution doesn't work after adding more cleaning agents. If you do use a strong stream, clean in narrow areas and don't let the water run over the same spot for longer than 10 seconds or so. A common PSI is around 500 psi to 1500 psi but you should start to see instant results at around 800 psi. ## How do I clean oil spills from the driveway? You can clean oil spills from your driveway with dish soap and water. Mix up some dish soap in a bucket and use a scrub brush to get into the cracks of your concrete and lift away any dirt or grime that has accumulated. After you're done washing it down, wipe off any excess oil or grease on the surface with paper towels before rinsing it thoroughly with water. If there's still an oily residue left over on the cement, try scrubbing it one more time with soapy water and then rinse again until all of the soap is gone. For best results, hose off your concrete every day for a week after using this method to clear away any leftover oils or grease that might attract new stains later on. ## How to remove green algae from concrete One of the most irritating things you can see on your concrete driveway is green algae. It's unsightly and it stains the surface. Removing it doesn't have to be too difficult, but if you want to get rid of it for good, there are a few steps you need to take before starting your work. A natural cleaner or baking soda works wonders for these algae stains. ## What causes green algae? Green algae form when water collects in cracks in your cement or on bare spots where paint has chipped off. Moisture is one of the biggest problems when it comes to this type of issue because it provides the perfect environment for microbes like mould and algae to grow. ## What can I do about green algae? If you just want to remove the green algae from your concrete, you can try using a pressure washer. This method will clean your pavement effectively but you need to be extra careful not to damage it with too much water pressure. Afterwards, use a scrub brush and soapy water to get rid of any remaining stains on the surface or in cracks. Be careful with using too much water as many local councils, such as [Port Macquarie Hastings Council](https://www.pmhc.nsw.gov.au/Residents/Water/Responsible-water-use), have strict restrictions on where you can use your water for cleaning. Check with your local area however. If you want to keep these microbes from forming again, first make sure that there's no more standing water on the surface of your driveway. Next, always hose off your driveway after mowing and/or rain as excess moisture is one of the biggest causes of algae growth. ## How do I prevent concrete from staining? Maintaining proper concrete care is essential if you want it to look good and last for a long time. Make sure that you always clear your driveway of oil or grease spills and remove fertiliser stains after parking or rain with a concentrated alkaline soap as these are some of the most common causes of staining. Concrete is an art, and if its not looking tip-top, there may have been an issue with the curing process or it may not have been [screeded correctly](/guides/concrete-decorative-resurfacing/how-to-screed-concrete). Another important element is the type of paint you use with your concrete. Latex paints are easier to clean but don't last as long as epoxy paints. Make sure to always cover your pavement with a coat of paint if you use epoxy, as it's more durable and less likely to leave stains behind.

Download Our App

Screenshot of the Localsearch App
Card highlighting that you can claim and future proof your business with the Localsearch App

Localsearch App

Find local businesses - anywhere, anytime.

Available on the Apple App Store iconAvailable on Google Play icon
Screenshot of the Localsearch For Business App
Screenshots of the Performance and Notifications sections of the Localsearch for Business App

Localsearch For Business App

Manage your business - anywhere, anytime.

Available on the Apple App Store iconAvailable on Google Play icon